
What you’ll need:
- Felt.
(I used red, mustard yellow, and white)
- Hot glue gun
- Scissors
- Fabric paint
- Needle/thread
- Trash bags
First:
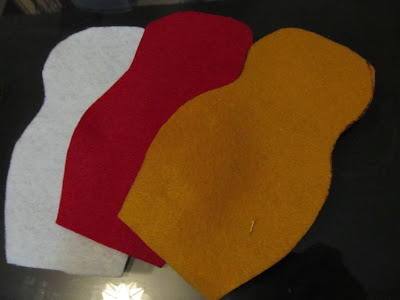


Cut out your OWL
body outline.
Each owl requires
a front and a back. So cut out 2 shapes
for 1 OWL.
Second:

Cut out enough
white circles for all of your owls. (I made 9 OWLS so I cut out 18 white
circles)
*make them quite
large, so that the eyes look OWLY*
The same thing goes for the black pupils. Cut out enough for all of your OWLS.
I also cut out
brown eyes for some of my owls, so the yellow owls didn’t have yellow eyes, and
some of the others had brown eyes to make them all look a bit different.
EX:

Also, you’ll need
to cut out a beak! An easy A shape will do.
Third:

Cut out this S
shape for the top of their eyes. This completes the OWL look.
Fourth:

Cut out this apple
shape for their bellies.
( I sewed some on
but it took too long so I hot glued the res on their owl bodies.)
*if you do decide
to sew them on, sew them on BEFORE you sew the bodies together.*
Fifth

Cut out your OWL’S
wings like above photo. Then, cut a slit
half way through the wing, this allows for the wing to have a wing shape like:

Each owl will need
2 wings. Once you’ve cut these out, put
them aside. I sewed them on very last.
Sixth

Sew the 2 pieces
together. I used this basic to sew them
together.
*DO NOT sew
completely together. Leave a space that
you can easily stuff your plastic bags into*

All you do is
stick your needle through both pieces then wrap the thread around the needle
once to make this kind of stich. Easy peasy.
Seventh:

Now stuff your
OWLS with grocery bags. It’s a pretty
good way to recycle them if I do say so myself.
Once you’re done
use the same sewing technique to sew them back together.
Eighth

Glue on their
faces. Glue on their eyes, noses, and
the S shape for the top of their eyes.
I painted the
white dots on all of the black pupils to add some cute detail.

I also painted
HOPE, and NOEL, and JOY on their bellies to add some more cute detail.
Ninth

Cut a long
rectangle shape from your felt. At each
end cut slits to make it look like a scarf, and wrap them around your OWLS.
Tenth:

Sew on your wings
( you can sew them on before you put on your scarf, it’s easier)
I just sewed a
stitch or two to the body and it worked just fine.
Last, you sew on your thread to the top of
their heads . You can glue them too, but
I sewed mine.


Blurry pic, but
you get the picture.
Now:

Now, you have all
these cute owls ready for hanging.
*for even more
Christmas detail, I glued dots or snowflakes on some of the bellies and put white
glitter on them to add a snowy effect*


& for a little easy DIY holiday extra:
*with just 3 easy
steps*
What you’ll need:
- A thick-er thread
- Two colors of felt ( I used
red&white)
- Scissors
- Hot glue
First:

Cut out a bunch of
circles around the same size
Second:

Place 1 circle on
the bottom of the string & put a dot of hot glue in the center
Third:

Place another
circle right on top
& repeat. I did one white, one red.

then this happens,
and you’ve got yourself a cute string of circles to wrap around your tree!


Have fun
decorating your Christmas Tree!!!
From your One&Only,
Rozslin
No comments:
Post a Comment